


After a long year of compiling, testing, typing, blogging, eating, scanning, and designing, "My Mother's Cookbook" is done!
I learned so much along the way, not only about ingredients and techniques, what I can do in the kitchen (and what I really need to work on!) but also about the world of food blogging. I have been so inspired by the many great food writers and bloggers out there—you have opened my eyes to so many interesting ways to write about cooking. I don't know where this blog will go next (other than on the shelf for a while, as I welcome my new little girl into the world), but thanks to all of you, I know anything is possible: White Fluffy Icing, Orangette, and The Wednesday Chef to name just the three that were thanked in my cookbook, but also Big Girls, Small Kitchen, Cook That Book, Foodycat and many others.
Of course, all of the credit goes to my mother for supporting me through this project, answering my frantic phone calls when I was in the middle of a recipe card trying to figure out what to do next, or why an ingredient was listed but never mentioned in the recipe, or how long something was supposed to bake in what temperature oven since those details were not listed on the card...anyway, I guess someday I will impart undecipherable recipes to my daughters and they will be equally frustrated. Or they will just pull "My Mother's Cookbook" off the shelf and everything will be perfectly clear!
Pick up a copy today at Blurb.com if you are interested—hard cover and soft cover versions are available—or just flip through the pages and enjoy.
Like I said, I think the blog will go on the shelf for a while...maybe it will re-emerge with a different project in 2011, maybe the cookbook will be the next selection on Oprah's Book Club. Wherever this experience takes me in the new year, I'm just proud to have a finished product sitting in the cookbook rack in my kitchen and the memories of a year spent cooking, learning, and making my mother so incredibly happy. Worth every minute!
Wednesday, December 22, 2010
Tuesday, December 14, 2010
Making My Mother Proud
Now that the cookbook is finished and I have 76 pages of wonderful recipes in readable form (NOT on recipe cards in a disorganized pile on my counter), I can show off my new skills in the neighborhood with relative ease. I typically make a little sampler of goodies for a handful of neighbors on our street; this year I chose 4 of my mother's recipes that are real holiday favorites: Cranberry Orange Relish, Poppyseed Wine Cake, Coconut Macaroons, and Cinnamon Sugar Pecans.
[You can find all of these recipes in the cookbook or here on the blog...I haven't announced the cookbook here yet because I haven't had an opportunity to show my mom the final product. I would hate for her to see the electronic version first! I did post a preview of it my Facebook page; if you are friends me with, check it out there. More to come on the cookbook early next week. ]


[You can find all of these recipes in the cookbook or here on the blog...I haven't announced the cookbook here yet because I haven't had an opportunity to show my mom the final product. I would hate for her to see the electronic version first! I did post a preview of it my Facebook page; if you are friends me with, check it out there. More to come on the cookbook early next week. ]

My mother traditionally has baking days during the holidays to create goodie baskets like these for her friends and neighbors. And she'll have dessert parties during the holidays where the amount of baking would boggle your mind. So I think she would be proud that even in my current state, I had time to devote to spreading a little holiday deliciousness just as she has been doing year after year.
I picked up some .99 baskets and 100 cellophane bags for $14.00, the jars were $10 for 16, and the ingredients all told were probably no more than $20 since most of them are common staples you have in your pantry anyway. So in the end, 8 baskets of goodies = about $50 total spent on spreading some tasty holiday cheer up and down the street.

Happy Holidays!!!
Monday, November 29, 2010
Thanksgiving 2010

Well, another Thanksgiving goes by in the usual way...quickly, so that Christmas can take over every aspect of our lives. But first, a few recipes from my mother's Thanksgiving menu.
We spent the day at their house, just the parents, me, my husband, and daughter, and Angus the dog, of course. Quiet, relaxing, and food-filled. One minor conundrum: mom decided to have the fresh turkey she purchased butterflied by the butcher, which would have been no problem had she also purchased a roasting pan big enough to handle the flattened bird. So my husband and I wrestled with the thing to truss it back to it's previous form to fit it in the standard roasting pan. In the end, the resulting meat was completely delicious and was really just a complement to all of the amazing side dishes my mom prepared: cornbread dressing, Brussels sprouts, sweet potato casserole, scalloped oysters, jalapeno corn casserole, homemade rolls...and I threw in the cranberry orange relish and pecan pie.
All of these recipes will appear in the soon-to-be-released cookbook, which is nearing completion. I really can't believe the process is almost over! I have to submit the PDFs to Blurb.com by December 12 in order to get the published copies by Christmas, so my deadline is looming. There's going to be a big celebration when this one is finished...just in time for me to give birth to my new little project! Due date: February 4, 2011.

Cornbread Dressing
¼ cup butter
¾ cup onions, minced
½ cup celery, chopped
½ tsp pepper
1 tsp ground sage
3 cups cornbread crumbs
3 cold biscuits, crumbled
1 slice of white bread, diced
1 cup turkey or chicken broth
2 eggs, beaten
Preheat oven to 400. Melt butter in a heavy pan; add minced onion and celery and sauté with pepper and sage. Remove from stove and pour into the bread mixture; stir/toss until well mixed. Pour on enough broth to moisten the bread mixture (do not make soggy), add eggs, and mix lightly. Pour into a baking dish about 2 inches deep. Bake until lightly browned and cooked through. Do not overcook.

Cranberry Orange Relish
1 bag fresh cranberries
1 large navel orange
Sugar to taste
Wash orange and cut it up in chunks with the peel on. Mix in orange and cranberries in a food processor, adding sugar to taste.

Pecan Pie
3 eggs, well beaten
¾ cup sugar
1 cup white Karo syrup
1 tsp vanilla
2 Tbsp melted butter
Pie crust
Preheat oven to 350. Mix ingredients and pour into an unbaked pie shell in an 8” pie pan. Arrange whole pecans on top to cover filling. Bake until knife-blade comes out clean, about 1 hour, 15 minutes.
Sunday, November 14, 2010
Simple Cinnamon Rolls
 Cinnabon. I have a real problem with Cinnabon. First of all, you can smell that shop from the farthest end of every mall or airport in America...that insipid syrupy sweetness permeates everything. Combine it with the greasy stench of McDonald's and nausea will certainly ensue. Secondly, they make my hands sticky just thinking about them. Finally, Cinnabon cinnamon rolls could feed a family of four for three days. No one needs that much cinnamon roll in one sitting.
Okay, enough of my hormonal soapbox. The reason for my rant is that I have discovered yet another one of my mother's recipes that achieves perfection simply by being simple: the Christmas Cinnamon roll. Made from the same dough that makes her famous Dinner Rolls, the roll consists of bread, cinnamon, sugar, and butter, but mostly bread. A soft buttery dough with subtle hints of cinnamon, rather than oozing stickiness everywhere. These are not your typical cinnamon rolls but when I was growing up, these were the definitive. At some point in the past 39 years, cinnamon rolls became very sinful in my opinion. I'm going back to basics.

The Dinner Rolls should come first. My mother's recipe produces a nice buttery dough that is both light and rich. She makes these pretty often and sometimes fails, but mostly succeeds in making them perfect every time. If I can find success on my first try, they must not be that difficult!
Dinner Rolls Recipe
1 cup milk
1/3 cup + 1 tsp sugar
1 tsp salt
1/2 cup shortening (or 1 stick margarine)
1 pkg dry yeast
2 eggs
4 cups flour
Heat milk, sugar, salt, and shortening until shortening melts. Cool to room temperature. In a small bowl, dissolve yeast in 2 Tbsp warm water. Stir in 1 tsp sugar and set aside. Beat eggs and add to the cooled milk mixture. Stir in yeast mixture. Mix in flour using a dough hook on low speed mixer. When dough comes together (is moist and somewhat sticky) place in a bowl and cover with a damp cloth for about 2 hours until the dough doubles in size. At this point, you can refrigerate overnight; then make into rolls and let rise 1 1/2 hours before baking. Bake at 375 for about 20 minutes, depending on the size of the roll, until lightly brown on top.

Mom makes the cinnamon rolls every Christmas and brings them out arranged in the shape of a Christmas tree after we open presents on Christmas morning. You can eat two or three and not feel like you're going to explode. And you don't need to take a shower afterwards to get the sticky off. Perfect and simple. Delicious and festive. Try them anytime of year.

Christmas Cinnamon Rolls
Roll out the Dinner Rolls dough into a rectangle about 1/4 inch thick. Brush with 2 Tbsp melted butter and sprinkle with generous amounts of cinnamon and sugar. Roll up the dough and then slice into 1 inch thick rolls. Lay them flat on a buttered baking sheet and let them rise for 1 1/2 hours before baking at 375 for about 20 minutes, until they are puffed and the cinnamon sugar starts to caramelize.
Additions: add raisins and/or pecans to the inside, and maybe drizzle with icing
Saturday, October 16, 2010
English Toffee

I tried this recipe many years ago in my tiny apartment, before husband, before kids. It looked so easy, but I failed miserably. Hard crack stage quickly became giant ball of glue stuck to my cheap-o pan. But today—with my trusty candy thermometer—success!

Mom makes this at Christmas every year and the holiday tin she puts it in quickly becomes empty. Last year, she decided to make it as her contribution to our family "gift game," the one where you draw a number and then either choose a gift or steal from someone else. Well, the game was not taking place until Christmas night, so for all the days leading up to the game, everyone was becoming very disgruntled that she had not made the toffee...we scoured the house and accused her of falling down on the job. How could we have Christmas without the toffee?!? I think in the end she gave it up and told us we had to wait to see who could get it in the game. I can't remember who actually won it legitimately because as soon as it was out in the open, it was gone. Mom, next time, you make a batch and I'll make a batch and everyone will be happy.

English Toffee
1 cup sugar
1 cup butter
3 Tbsp water
1 tsp vanilla
1 cup chocolate chips
1 cup chopped pecans
Combine first 4 ingredients in medium saucepan. Cook over low to medium heat, stirring constantly, to a hard crack stage (300). Remove from heat and pour onto greased cookie sheet (9x13). Cool 1 minute. While hot, cover with chocolate chips and spread as they melt. Sprinkle nuts on top. Do not refrigerate; it may cause the chocolate to separate from the toffee. Just sit on your counter until it's hard enough to break into pieces.
Thursday, October 14, 2010
Crunch Time

English Toffee, Candied Walnuts, Christmas Cinnamon Rolls, Pecan Pie, Sweet Potato Casserole, Homemade Dinner Rolls...and a few others.
After tackling and conquering the Black Bottom Pie, though, I feel like my work here is done!
After 10 months of testing and compiling recipes, I have a little over 50 recipes to include in the cookbook. I weeded out many from the original list of about 100 because I realized they had little or no significance for me as far as childhood or family memories were concerned. Some didn't make the cut because my mother could not remember ever making them, even though they were in her recipe collection! And then some I just could not muster the energy to even attempt: 3-day pickles (with lye!), Christmas Pudding, Tomato Aspic...I had high hopes of getting through everything, but low and behold, morning sickness just got in the way! Maybe after the baby comes and I'm just lounging around the house on maternity leave with nothing to do...
So as I dive into the world of self-publishing, forgive me if my blog suffers from neglect. I will post a few of the remaining tests just because they are soooo good and you should experience them too. But the remaining weeks before Christmas (only 73 shopping days left, my friends!) will be dedicated to completing what has been an extremely fun and empowering (and exhausting) journey. I've loved spending so much time in the kitchen—showing my daughter that her working mom can also be a homemaker. I've been empowered by the fact that I can recreate so many taste memories from my childhood, and actually cook this amazing homemade-with-love food that I grew up on. And I have thoroughly enjoyed what I've discovered along the way about the strong mothers in my family tree who have passed these recipes along to their daughters throughout the generations. In the end, this was the purpose for me as well...to pass along a great tradition of home cooked meals to my TWO daughters. And they will have them in a beautifully bound collection! But don't worry...all those recipe cards will not be thrown in the trash. I think the Smithsonian might want them.
Monday, October 11, 2010
The Greatest Pie on Earth

Well, I've done it. Reached the pinnacle. Crossed the finish line. I have done what few even attempt and I survived to tell the tale. I made my mother's famous Black Bottom Pie. Four stages of instructions, two pages typed, thirteen ingredients, and two hours of my life I'll never get back. Worth every single minute.
This pie is one of those pies that you could quite easily sit down and eat the entire thing in one sitting...just you, a 13x9 pyrex baking dish, a fork, and bite after bite of dreamy creamy chocolately goodness. I think my sister has actually done this, which is why she vows never to make it herself. She had to move to the East Coast just to be 3,000 miles away from the one woman who makes it. And when she comes to visit, it's really the only required menu item. We think it's best for breakfast.
As my father says, it's like walking into a cold breeze with your mouth open. Or I prefer describing it as being like heaven and angels and all things beautiful. It's deceptively light and fluffy, with a dark chocolate cookie crust in the perfect thickness to give it just the right amount of decadence. It's an elegant dessert...the layers are straight and symmetrical, the colors remind you of a tuxedo and ivory satin, and it floats in your mouth.
I've always been intimidated by this recipe and now I know why...it's pretty complicated, or at least doing it the first time was incredibly daunting. What if it didn't turn out right? A failed Black Bottom Pie would cause me to rethink this whole project. At several points in the process, I didn't think what was supposed to happen was happening so had to call my mom for some reassurance. Even when it was all said and done, I just wasn't sure I had pulled it off. After the first bite, though, there was no question. I had made a Black Bottom Pie and it was perfect.
Black Bottom Pie
Vera Davis
Makes 16 slices when using a 13 x 9 pyrex
1 box Nabisco Chocolate Icebox cookies
5 Tbsp melted butter
1 packet Knox gelatin (about 1 Tbsp)
2 cups whole milk
4 eggs, separated
1 cup sugar + 3 Tbsp, divided
1 Tbsp flour
Dash of salt
1 1/2 squares unsweetened chocolate, melted
2 tsp vanilla, separated
1/2 tsp cream of tartar
1/2 pint whipping cream
1/2 square unsweetened chocolate, grated
Crust: Crush one box of Nabisco Chocolate Icebox cookies in a food processor to a fine texture. Mix with melted butter. Press into the 13 x 9 pan. Heat in 400 degree oven for about 10 minutes or until very hot so the crust will hold together.
Filling: Stir the Knox gelatin with 4 Tbsp of cold water. Set aside. Pour milk into a double boiler to heat. Meanwhile beat egg yolks well and add to them 1/2 cup sugar and 1 Tbsp of flour mixed well. Add a dash of salt. Gradually blend this mixture into the hot milk and whisk to make smooth. Cook until the custard mixture coats a spoon, about 20 minutes.
Chocolate Layer: Take out 1 cup of the custard and mix it with 1 1/2 squares of unsweetened chocolate that has been thoroughly melted. Blend this until smooth and add 1 tsp vanilla. Spread this mixture over crust. This will make a very thin layer so be careful not to pull the crust apart as you spread.
Cream Layer: Remove pan with the filling mixture from the double boiler. Dissolve the congealed gelatin mixture to a liquid and add it to the filling mixture. In a separate bowl, make a stiff meringue by beating 4 egg whites, 1/2 cup sugar, 1/2 tsp cream of tartar, 1 tsp vanilla. Fold meringue into the filling mixture. Pour on top of chocolate layer. Let stand in the refrigerator until firm, preferably overnight.
Topping: Beat whipping cream and 3 Tbsp of sugar. Spoon on top of chocolate layer. Use remaining 1/2 square of unsweetened chocolate and grate it on top of the whipped cream. Return to refrigerator. This will make 16 servings and will keep several days...or about 15 minutes.

This is the scariest moment in the life of a Black Bottom Pie. After serving it at a family dinner, I'm left with just enough to do some serious damage to that pregnancy weight gain limit. Do I take one more bite, which could lead to another and another until the whole thing is gone (a sad moment in itself)? Or do I show restraint, be conservative in my approach, and save the last corner to savor another day? What did I do? I'll never tell...
Monday, September 27, 2010
Great Granny The Amazing

Let me paint a picture of Florzell England Howard, my maternal great-grandmother. (The teapots will make sense in a minute).
I was never able to fully appreciate or even begin to empathize with my mother (or grandmother or great grandmother) until I became a mother myself. I've always known the story of my great grandmother but when I heard the story again recently, at my uncle's funeral, it struck me as simply amazing. Her story, her life, is nothing short of miraculous. And whenever I feel overwhelmed by this job of "mother" and feel like my life is just too exhausting to bear, I think of her. I don't know exhaustion.
Great Granny was born in 1867. As a girl of 12, Florzell was diagnosed with what was probably a minor case of pink eye, to which her doctor prescribed some drops that consequently made her completely blind in both eyes. (If there was ever a time for a malpractice lawyer.) She married my great grandfather, Benjamin Franklin Howard, in 1889, and had 6 children including my grandfather, Augustus Paul. In 1909, my great grandfather died suddenly after 20 years of marriage at the age of 43, leaving Granny to take care of all 6 children, on a working farm in rural Sparta, blind. In case that didn't register with you...she took care of 6 children, on a farm, completely blind. How in the world did she do it? What was a day like in her life? To be able to spend one day with her on that farm, kids running around, mouths to feed, laundry to do...I can't even imagine what kind of tasks she had to do just to keep her family, her home, and her farm running. And she did it all blind. Mind-boggling.

One of the tales often told about Granny was that she collected teapots, over 500 of them, and could pick one up and tell you its color and pattern and where it came from. The picture above are of four of her original teapots that have made it to my collection (inspired by her, I also collect teapots), one of which we randomly stumbled upon in a cupboard at my uncle's house a few months ago. Another story is how she would wake up her children to tell them when it was snowing...she could taste it in the air. And my mom talks of trying to steal cookies from the kitchen—Granny would hear her from the other side of the house, literally catching her with her hand in the cookie jar. I also hear that she dipped snuff. After the death of her husband, she wore black every day until her death in 1955. I would have loved to know her. If only to watch her move through a day in her life.
 |
| Great Granny with my grandfather, uncle, and my cousin |

One special tea concoction she always made for luncheons, baby showers, and tea parties of all kinds was Russian Tea. It can be hot or cold, and it is a bit sweet but not in a Sweet Tea kind of way. It has more layers of flavor...orange, lemon, spices. I made a batch and it was, once again, one of those flavors that brought back memories. No cookbook about my mother's recipes would be complete without some mention of tea. It would be like...a Paula Deen cookbook without butter. A Bobby Flay cookbook without chipotle. You get the idea.
Russian Tea
Boil together 2 cups of sugar, 2 cups of water, 1 tsp Allspice, 12 whole cloves, 1 stick of cinnamon, for 5 minutes. Add 4 rounded tsp of loose tea and steep 10 minutes. Strain tea and add 1 1/2 cups of no pulp orange juice and 3/4 cup of lemon juice. Then add 4 quarts of water. Either reheat to serve hot, or chill. (I'm going to say that a splash of bourbon wouldn't harm this drink one bit! But my mother would strongly disagree.)
Thursday, September 9, 2010
Chili Three Way

I'm not sure how this recipe found it's way to our family, but it was a staple growing up and is now my go-to chili recipe. When I think of chili in today's sense, I think of the 3-alarm variety—the kind that will light you up. Or I think of all those weird concoctions that you see on those challenge shows or at chili cook-offs, with ingredients like beer or chocolate or venison meat (I've obviously been watching way too much Food Network). But like most of my mother's recipes, this one is straight forward, straight up traditional chili. You may wonder why the chili powder is left to the end as almost an afterthought...my mother hates spicy food, so this chili is definitely of the mild variety. But it doesn't have to be. My husband and I made it one time for a "Big, Bold Reds" wine tasting party and he added red chilis from the garden and a jalapeno or two. We were all sweating after the first few bites, and we actually turned on the air conditioning in November. But it was painfully delicious.
Chili Three Way was the way my mother usually served it and we could decide which of the three we wanted to include: plain chili, or chili with spaghetti (because this chili could really be a hearty pasta sauce as well), or chili with spaghetti and topped with tamales. Now about these tamales...they were from a can. This was the only way I had ever experienced tamales until in the past 10 years or so, when I started ordering them in restaurants, wrapped in corn husks and filled with cheese and peppers, carnitas, asada, or any number of things. But tamales in a can?! What in the world? And what possessed my mother to ever decide to grab those of the shelf? Someone must have told her to do it specifically for this recipe, because I can't imagine she would have ventured down the international foods aisle otherwise. So I would say, add the tamales on top if you want, but get them fresh and not in the can. I'll never be able to eat those canned things again.
Chili
1 medium onion, diced
1 small green pepper, diced
2 Tbsp olive oil
2 lbs. ground beef or turkey
1 large can diced tomatoes
1 small can tomato sauce
1/2 tsp cumin
1 tsp cocoa
15 oz can of dark kidney beans
salt, pepper, and chili powder to taste
Saute onions and pepper in olive oil until soft. Add meat and stir until lightly browned. Add tomatoes and tomato sauce. Stir in cumin, cocoa, chili powder, salt and pepper. Simmer slowly for about 45 minutes. Add kidney beans and continue simmering for about 30 minutes. Serve with traditional chili toppings: shredded cheddar cheese, diced scallions, and sour cream. OR serve over spaghetti and top with GOOD tamales for Chili Three Way!
Monday, September 6, 2010
Blueberry Loaf

Another recipe in the collection is from an "extra" sister, Ms. Suzy Lynch. Growing up, she was one of my father's students and was truly a member of the family in many ways. I loved her because she was just so interesting and treated me like a sister, or really more like a daughter. She's the kind of person who wore maxi skirts and caftans and bell bottoms, and had the best chunky jewelry she would let me put on. I would sit mesmerized watching her put on that kind of eyeliner that you would "paint" on with a teeny brush. And best of all, she would send me bags of gummy bears—the real ones from Germany. At Christmas, if she wasn't spending it with us, she would send huge boxes of presents, most of them hand-sewn or home-cooked. And when I went away to college, she sewed a huge laundry bag for me with name beautifully stitched on it—I still use it today for dry cleaning—filled with all of those great dorm room essentials...complete with a huge bag of gummy bears. Suzy is, was, and will always be the ultimate homecook, seamtress, care package preparer, gummy bear supplier, and my special extra sister, aunt, mother, and friend.

This recipe actually called for cranberries, but blueberries were optional and certainly easier to find being that it is still technically summer. The orange flavor and glaze make this a delicious breakfast bread, super easy to make, and perfect for those almost-three-year-old hands to help stir in the blueberries.

Blueberry (or Cranberry) Loaf
Suzy Lynch
2 cups flour
1 tsp baking powder
1/4 tsp baking soda
1/2 tsp salt
1 cup sugar
1 egg
1 Tbsp butter
1 Tbsp lemon zest
3/4 cup orange juice
1 cup blueberries or cranberries
For glaze: 2 tsp honey, 2 tsp orange juice, 1 tsp orange or lemon zest
Mix dry ingredients well and set aside. Mix wet ingredients and then slowly add dry ingredients. Fold in 1 cup of berries. Pour in greased loaf pan. Bake at 350 for 1 hour, 20 minutes. Cool 5 minutes and remove from pan. Prepare glaze and brush over cooled loaf.
Wednesday, September 1, 2010
A Memory of Supper

I have a memory from my childhood, from Sparta, Tennessee, at my grandparents house. I have no idea how old I was, not sure who was sitting around the huge dining room table—at least 10 people—and can only vaguely remember the dishes served. I honestly think that the picture in my mind may just be a collection of pieces of memories from many different meals, but they all come together into one great experience: the Sunday supper.
There were so many dishes on the table, I think...fried corn, sliced tomatoes, maybe black eyed peas, and a giant tureen of chicken and dumplings. Huge dumplings, like buttermilk biscuit size, and they were creamy and peppery and drowned in this amazing sauce. I remember chicken pieces, like thighs, perfectly cooked and so tender. I could never forget it, and I don't think I've had chicken and dumplings since then. No way I could ever recreate such a thing; reality can never live up to those kind of memories. But I was happy to see the recipe card in my mom's collection just so I could give it a try. She thinks it was from a southern cooking magazine but I have to believe it was similar to the one that was cooked that day in Sparta.
I did end up referring to a recipe in a Southern Living cookbook since the instructions for making the dumplings in my mom's recipe were not too explicit and I didn't want to screw up the most important part of the dish. But the Southern Living recipe didn't even mention the gravy, so I switched back to the recipe card for the final touch. As usual, I improvised on the final preparation and how to assemble it all together. In the end, I'll say it was a success primarily because my husband liked it and he ate the leftovers the next day for lunch...a sign of a true winner. For me, though, it didn't even approach my Sparta memory of that dish. Some things just cannot be recreated.
Chicken and Dumplings
1 5-6 lb. whole chicken
2 sprigs parsley
4 celery ribs with leaves
1 carrot, sliced
1 small onion, diced
2 tsp salt
1/4 tsp pepper
1 bay leaf
Put all of the above ingredients in a large pot. Add enough water to almost cover chicken. Bring to a boil, then simmer for 2 hours until chicken is tender. Let cool and remove the meat from the bones. Discard the carcass and the cooked vegetables, reserving the broth.
Dumplings: Combine 2 cups of flour, 2 tsp baking powder, and 3/4 tsp salt. Cut in 1/3 cup of shortening with a fork until mixture is crumbly. Add reserved 2/3 cup of broth, stir with a form just until dry ingredients are moistened. Turn dough out onto a lightly floured surface, and knead lightly for 30 seconds. Roll dough to 1/8-inch thickness; cut dough into 2 inch squares (I used a round cookie cutter about 3 inches in diameter). Bring remaining broth to a boil and drop dumplings in one at a time. Cover and reduce heat; simmer 10 minutes.
Remove dumplings from the pan and set aside with the chicken.
Gravy: Strain chicken broth. Measure 4 cups into saucepan. Heat to boiling. Combine 1/2 cup flour and 1 cup cold water and then gradually add it to the broth mixture. Mix well. Cook and stir until thickened. Add generous amounts of salt and pepper to taste. Return the chicken and dumplings to the pan and serve.
Christmas in August
I'm finding that in order to get through the recipe testing part of this cookbook project, in time to get the cookbook done before then end of the year, I have to test Christmas holiday recipes in the summer...and it just feels weird. Eating a crescent cookie in August is like having pumpkin pie for Easter.

But this cookie definitely has to go in the cookbook. It reminds me of all the Christmas dessert parties my parents have had throughout my life, where the dining room table was filled with desserts all sitting atop dainty holiday plates and dishes, on a red table cloth with a poinsettia as the centerpiece. Green taper candles in crystal candlesticks, a fire in the fireplace, hot spiced tea in china cups with saucers, and Perry Como on the record player. My mom loves Christmas. She often has to restrain herself and waits to start listening to Christmas music until the day after Halloween. She makes needlepoint stockings, and buys Christmas Eve pajamas for everyone in the family. She is truly Mrs. Claus. So learning a recipe for a Christmas cookie that I can make at the holidays is a must for me...my attempt to become a Mrs. Claus too.

This is one of my sister's favorite cookies and she has definitely mastered it. It was pretty easy, except for the fact that the recipe card didn't list a measurement for the flour. Wha? So I winged it, once again. 3/4 cup of flour is probably a little too much because the cookies were a little dry and crumbled a bit when I rolled them in the powdered sugar. But the flavor was there and they looked like they should be on one of those plates of cookies you take home from a Christmas cookie party. So it was a little bit of Christmas in August. Kinda weird, but still good.
Pecan Puffs / Crescent Cookies
1/2 cup butter
2 Tbsp sugar
1 tsp vanilla
1 cup pecans
3/4 cup flour
powdered sugar to coat
Beat butter, sugar, and vanilla until creamed and stiff. Measure then grind pecans to a very fine "sandy" texture. Stir pecans and flour into butter mixture (will be a thick batter but not crumbly or dry). Roll dough into small balls or crescent shapes. Place on greased cookie sheet and bake at 300 about 45 minutes. Roll in powdered sugar; when cooled, roll in sugar again.
Friday, August 13, 2010
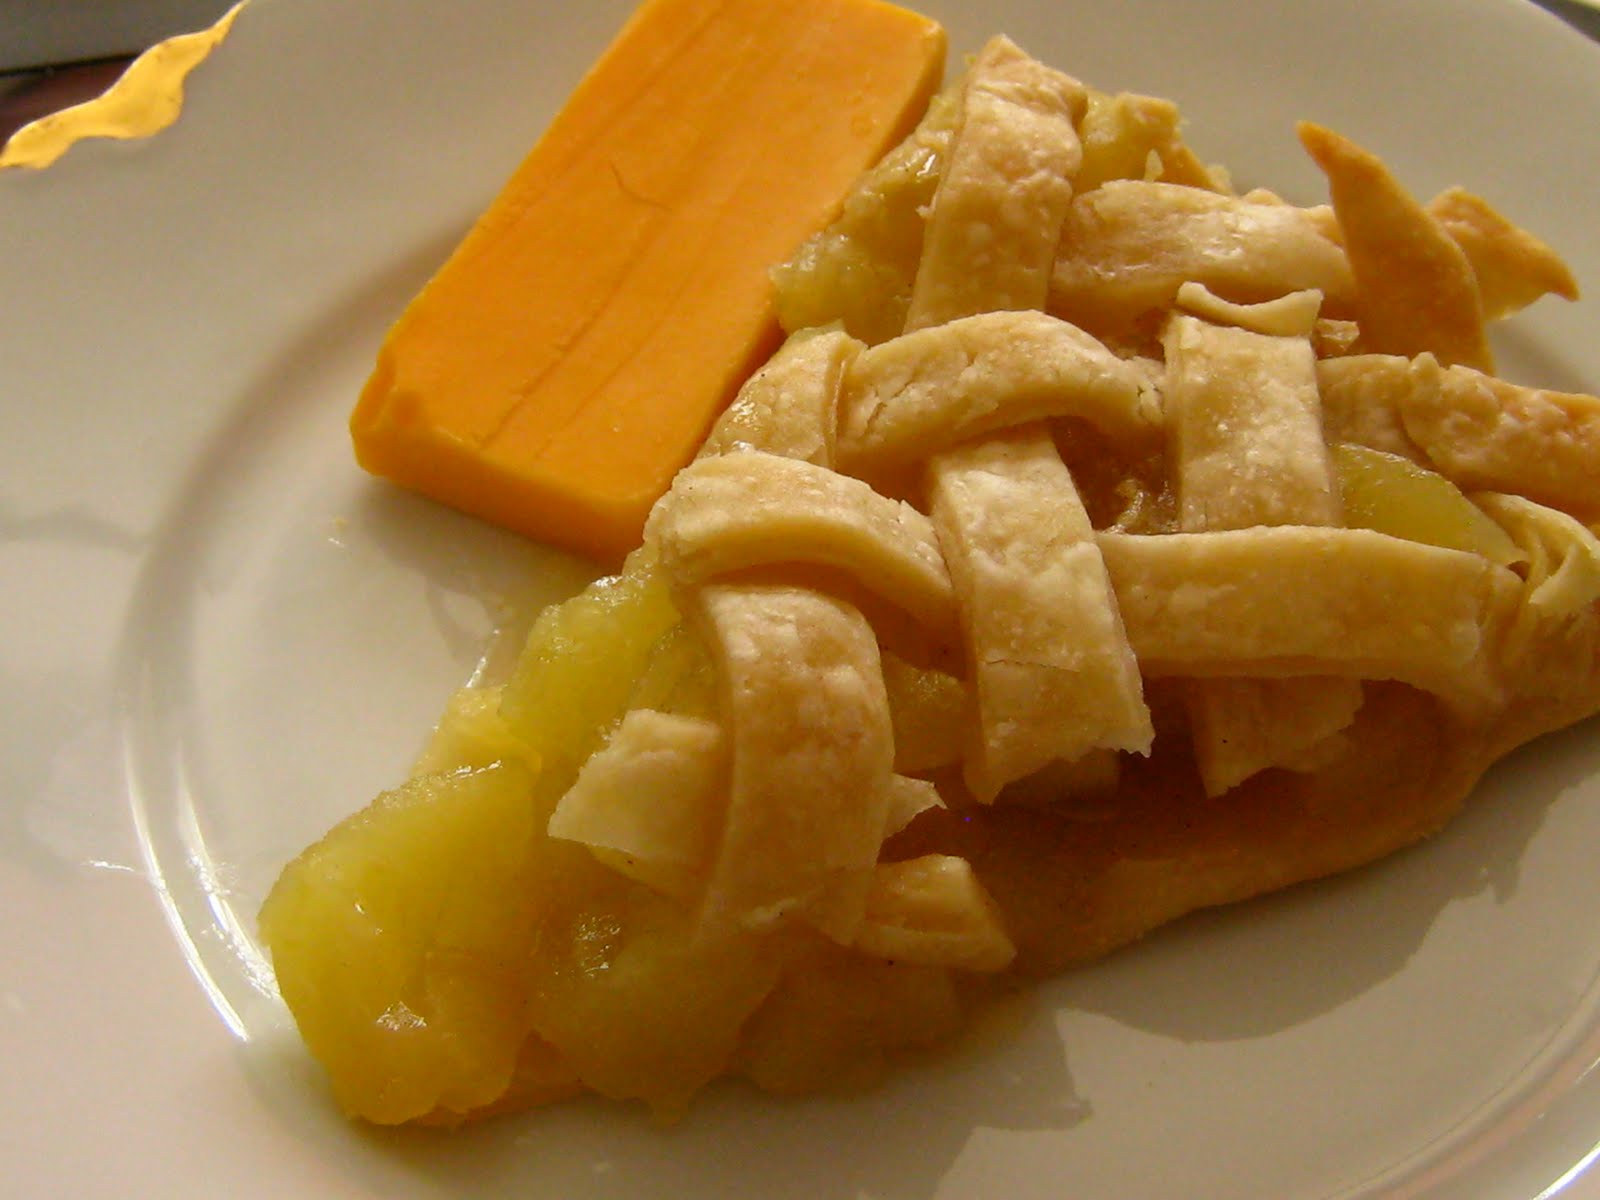
Kleeman's Apple Pie

Many years later, my dad convinced my mom to enter the pie into a contest. They had a subscription to the Long Beach Symphony at the time, which was hosting a pie contest (huh?) Anyway, it took some convincing...I don't know why my mom was so reluctant. Did I mention it's the best apple pie in the world??!! Maybe it was because the judges were executive chefs from the top restaurants in Long Beach at the time, and there were 40 entries.
My dad was sure she would win; she didn't. "The winners were not really pies," she said, "but one flan and another that wasn't pastry." Cheaters.
She went on to say, "As we were leaving I was sitting outside waiting for Dad to come pick me up and one of the chef judges came by and said he wanted to know if I really did the lattice top and how I did
it. He told me to come to his restaurant (where we had eaten before) and he would give us a dinner."

So the pie was a winner after all. I've been nervous to try this one just because the lattice top looks way too complicated. My mom said it would take 45 minutes to do...I did it in about 20! Ha! Just goes to show that sometimes things in life that are intimidating are really not so bad once you tackle them. Wish I had a pie contest to go to right now!


Kleeman’s Apple Pie with lattice pastry top
9" pie pan
1 Tbsp flour
4 Tbsp melted butter
¼ tsp nutmeg
¾ cup orange juice
1 cup sugar
4 medium very tart apples, peeled and chopped to quarter inch pieces (Pippen or Granny Smith)
Make pie crust (we use the Crisco Pastry recipe). Boil apples in water for about 5 minutes to soften slightly; drain and set aside. Mix flour into melted butter until smooth. Add nutmeg, orange juice, and sugar. Mix thoroughly. Place apples in the uncooked pie shell. Pour hot juice mixture over apples. Weave tiny ¼ inch strips for lattice pastry top. If desired you can put a solid top crust; be sure to cut air holes in top. Bake 15 minutes in 400 oven. Reduce heat to 350 and bake until golden brown, usually about 25-30 minutes. Serve with ice cream or a big slab of—what else?—cheddar cheese...just the way my dad likes it.
Mac and Cheese from Back in the Day

When I was growing up, my mother had a standard menu that she would roll out on a regular rotation. To this day, it's my favorite and it's always the one I request when she asks:
Pork Chops (or Country Ham with Red Eye Gravy, if we were really lucky); Mashed Turnips; Mustard Greens; Macaroni and Cheese; Black Eyed Peas; and Sliced Tomatoes
Simple. A good Southern meal that is a true family classic. Sometimes the turnips are replaced with stuffed "crook-neck" squash (see recipe below). Sometimes you'd see the dreaded pone cornbread on the side. No matter what the variation, this menu is my first and last idea of comfort food. It is the epitomy of a childhood food memory.
I've mastered the mustard greens, the black eyed peas, and the turnips, but I've never attempted the macaroni and cheese that my mom, and her mom, used to make. I think it's because of one simple fact: macaroni and cheese recipes in this day and age—the kind you find in restaurants or featured in gourmet magazines—are just so uber-cheesy, they make my mom's recipe pale in comparison. I mean, gobs and gobs of oozy, cheesy, saucy deliciousness, drowning the mac until it becomes just a faint hint of texture in what is really just a casserole of cheese product—this is definitely not my mother's mac and cheese. I have made a Martha Stewart macaroni and cheese recipe that required 5 different kinds of cheeses, about 4 pots and pans to prepare it, and in the end (2 hours later), while unbelievably delicious, I have to say it was a little too hi-falutin' for me.
Don't get me wrong...the more cheese, the better. I have never met a cheese I didn't like. I would take cheese over chocolate any day of the year and twice on Tuesday. When my husband and I went to France for our 1-year anniversary, my heart nearly stopped (literally) every time the lovely waiter brought around the cheese cart at the end of the meal [I wanted him to park it tableside from the moment we sat down until we left just so I could graze...but I guess that would be gauche]. On our last night of the trip at our last amazing restaurant, the cart had approximately 30 different cheeses on it, causing me to weep over the fact that we would have to leave this wonderful cheesy country behind. So, be clear. I have no problem with cheese. Pour it on.
But when it comes to my mother's brand of home-cooking, the recipes are often simple, and simple is most often the best. When I made her macaroni and cheese the other night, I took one bite of it and it was familiar and warm and made me smile. Nothing fancy or hi-falutin'. Just macaroni, cheese, butter, and a bit of milk. Amazing how those simple ingredients can combine to make something so memorable.
So while I will still eat the neon-orange, heavily processed macaroni and cheese served in the cafeteria of the school where I work, and will still make that arduous Martha Stewart recipe when I need to feel gruyere and fontina coursing through my veins, I will always say that mom's recipe is the one closest to my heart.
Macaroni and Cheese
Granny Lula
This recipe has no measurements...simply boil until al dente as much macaroni as will fit in the baking dish you have selected. Grate about 3/4 of a block of medium cheddar cheese, or more depending on the severity your cheese addiction. Cover the bottom of the dish with a layer of macaroni. Sprinkle with cheese and scatter small dollops of butter around the layer. Add salt and pepper. Continue this layering until your dish is topped off. Cover with more cheese. Then pour whole milk into the dish about halfway up the sides. Back at 350 until cheese is gooey and melted, and most of the milk is absorbed. Top with a bit of parsley for color.


Crook Neck Squash (yellow squash)
6 crook neck or yellow squash
3 Tbsp butter
15-20 Ritz crackers, crushed
1/8 cup evaporated milk
1/8 tsp Lawry's seasoned salt
Cheddar Cheese
Paprika
Cut ends off of the squash and scrape off any bruised places. Boil until tender. Remove from water and drain on paper towels. When cooled, slice squash in half and scoop out seeds and center area into a bowl. Mash the insides with butter and crushed Ritz crackers. Add evaporated milk and seasoned salt. Place squash shells in baking dish. Fill shells with mixture and top with cheese. Pour a bit of the evaporated milk on top and then sprinkle with paprika. Bake in oven at 375 until warmed through and bubbly, about 20-30 minutes.
This is a really yummy side dish, great with pork or roasted chicken. I tested this without Ritz crackers in the house and used bread crumbs instead. Bad idea. Stick with the Ritz!
Sunday, August 8, 2010
Recipe Cards Gone Awry

Here's the story: three recipe cards, two in my mother's handwriting, one in my Granny Lula's. The two from my mother are both called, "Never Fail Chocolate Cake, by Mother." Granny's is almost illegible due to years of wear and tear. The ingredients lists are all different, the instructions are different, so they must be different recipes, mistakenly assigned to the same name, right? Read further and the instructions for one introduce new ingredients not in the list. Huh. One calls for lemon juice; one calls for buttermilk. One calls for 2 cups of flour; the other 2 1/2 cups. One has brown sugar, the other doesn't. You get the idea.
So what is a recipe tester to do? Play it by ear, improvise, scratch head, ask husband if he can decipher the cards, wing it, and hope for something edible.
Needless to say, I will not post the resulting recipe here. Wouldn't know where to begin!
I have to say, the chocolate cake (which I turned into cupcakes) was mediocre (surprise, surprise) but not inedible by any means. It was moist and cakey, but just not chocolately enough. To the unknowing eye, it kind of looked like the color of a spice cake. But not to worry, the cream cheese frosting saved the day. This recipe, from Granny Lula as well, was one of those frostings that you would want to eat with a spoon. Forget the cake, just eat the frosting.
I will perfect the Never Fail Chocolate Cake someday...but I may have to channel the spirit of Granny to find out exactly what's supposed to go in this damn cake!
Cream Cheese Frosting
1 8oz. package cream cheese
1/2 cup butter
2 tsp. vanilla
1 lb. box of powdered sugar
Let cream cheese and butter soften at room temperature. Combine all ingredients and blend well with mixer until smooth. [I hear from a friend that sifting the powdered sugar will help the consistency.] Spread or pipe on cake (or cupcakes).
Thursday, August 5, 2010
A Necessary Detour
It's been weeks since my last post and my guilt is overwhelming! How can I let my blog just languish in the ether? How can I call myself a blogger if I don't constantly post?
Well, I guess the important thing is that I haven't been languishing in the kitchen. While I've taken a necessary detour from my mother's cookbook project (for reasons that will be revealed later), I have been truly inspired by the freshness of the season: peaches, tomatoes, arugula, fresh figs, lemons, mint...

 I've mentioned homemade bread before—it is my new obsession, when I have time to be obsessed about something.
I've been baking bread with my new best friend, Artisan Bread in Five Minutes a Day, the greatest bread baking cookbook on the planet by Jeff Hertzberg and Zoe Francois. I don't know what it is about baking bread, but it is empowering for me. And the Master Recipe in this cookbook is so incredibly simple but produces the most amazing loaves—I've made several batches in the past few months and have not screwed up a single time. It's truly foolproof. If anyone out there is intimidated by baking bread, go buy this book and a pizza stone, and go to town!
The recipe is essentially this: 3 cups lukewarm water; 2 packets of yeast; 1 1/2 tablespoons of kosher salt; 6 1/2 cups of flour. Mix it with a standmixer with the dough hook. Let rise for two hours and then you can store it in the fridge for up to 5 days. Just pull off a grapefruit size hunk, knead it a bit, form it into a variety of shapes, let rest for about 40 minutes, then bake on a pizza stone at 450 for about 30-35 minutes. There are many variations on this recipe in the book, along with great recipes for side dishes, pizzas, appetizers, and main dishes.

Well, I guess the important thing is that I haven't been languishing in the kitchen. While I've taken a necessary detour from my mother's cookbook project (for reasons that will be revealed later), I have been truly inspired by the freshness of the season: peaches, tomatoes, arugula, fresh figs, lemons, mint...

[Grilled Peaches with Gorgonzola and Proscuitto over a bed of Arugula]
The above came together on a gorgeous Sunday morning that Olivia and I had all to ourselves (one of the few gorgeous mornings we've had this year, thanks to an unbelievably long season of June Gloom). Daddy was out of town so we pulled out the little swimming pool and a beach chair and made the backyard our own private resort.
I had been wanting to grill peaches for a while because they seem to be a staple item in every celebrity chef's cookbook and on all the gourmet magazine covers when summer rolls around. So I thought I'd give it a go. Now normally, I don't touch the grill—it's not my domain. I leave that to the expert in the house. But why not? It doesn't require actually building a fire after all. Just turning some knobs. Once I figured out how to find the Low setting on the dial...I know, kind of a standard operation, but I was in foreign territory...I whipped out those peaches, brushed them with some olive oil, and laid them on the grates (is that what they're called?) along with some homemade bread and a frozen thin crust margherita pizza I had in the freezer.
While Olivia splashed around, I whipped together this beautiful little picnic with very little fuss and in very little time. Under our big, beautiful tree, we sat on a blanket and ate and played and laid on our backs looking up at the tree, and it was perfect. For just a few moments, mommy and daughter had a sunny summer moment, and Angus didn't even try to steal our food.

I've been baking bread with my new best friend, Artisan Bread in Five Minutes a Day, the greatest bread baking cookbook on the planet by Jeff Hertzberg and Zoe Francois. I don't know what it is about baking bread, but it is empowering for me. And the Master Recipe in this cookbook is so incredibly simple but produces the most amazing loaves—I've made several batches in the past few months and have not screwed up a single time. It's truly foolproof. If anyone out there is intimidated by baking bread, go buy this book and a pizza stone, and go to town!
The recipe is essentially this: 3 cups lukewarm water; 2 packets of yeast; 1 1/2 tablespoons of kosher salt; 6 1/2 cups of flour. Mix it with a standmixer with the dough hook. Let rise for two hours and then you can store it in the fridge for up to 5 days. Just pull off a grapefruit size hunk, knead it a bit, form it into a variety of shapes, let rest for about 40 minutes, then bake on a pizza stone at 450 for about 30-35 minutes. There are many variations on this recipe in the book, along with great recipes for side dishes, pizzas, appetizers, and main dishes.

[Pesto Chicken Salad with Burrata, Sundried Tomatoes, and Arugula on Homemade Ciabatta Rolls]
While on my detour, I've also spent a lot of time perusing some of my favorite food blogs, gaining inspiration, and marveling at how prolific they are!! How do they have the time? The one I got the above recipe from is called BGSK (Big Girls Small Kitchen) and I wish they were around when I was a "quarter-life cook" living on my own in my tiny apartment and just beginning to learn that I could actually prepare food that wasn't intended for the microwave. This was around the time that cooking shows were starting to change my culinary landscape, and that of the entire country. My first show was The Naked Chef with Jamie Oliver, years before he would become a crusader against childhood obesity. He was darling and hysterical and his food was so unfussy and pure. From then on, the only channel I would ever want to watch was the Food Network—that was really all there was when it came to cooking shows—and then my cookbook collection started, and my repertoire of "go to" recipes expanded, and now it's food blogs and Top Chef and my very own cookbook project.
Anyway, the sandwich above was perfect for a picnic at the Hollywood Bowl; one was plenty for my husband and I to share. Knowing that I had roasted the chicken myself a few days before, and that the pesto was also homemade, the recipe was that much more satisfying. While I love eating out at restaurants fine and cheap alike—and will eat almost anything a food truck will serve me—I am truly appreciating the satisfaction of a homemade meal that involves as little prepared or packaged food as possible. I guess I'm trying my hand at making things from scratch, whenever I can possibly find a few extra moments to do it.
I'll be making my way back onto the cookbook project road soon, now that the reason for my detour—morning sickness—has seemingly passed. I just couldn't face another chewy, gooey cookie recipe when all I wanted to do was have a pickle and a saltine cracker. Yep, that's right baby #2 is on the way in February, so I've got to "get on the stick" as my mother would say and whip this cookbook into shape before another little munchkin enters my life. I've realized I need to focus more on compiling the recipes into the cookbook layout itself than on testing recipes. I have a huge stack of cards I just need to type up and lots of decisions to make about accompanying copy, fonts, colors, photos (I'm a graphic designer after all, and could spend a year just creating the book!) So back to it I will go with a jar of pickles at my side.
Wednesday, June 30, 2010
Chewy and Gooey

Ahh, the joys of spending the whole morning in the kitchen baking up a storm. I'm on vacation and I should be relaxing, right? Kicking my feet up and watching hour upon hour of Food Network shows? You would think, but I find baking so incredibly relaxing and calming and peaceful. The sense of accomplishment is well worth the sore feet.
Yesterday morning produced three chewy, gooey desserts: Fudge Cake, Pecan Pie Bars, and Chewy Oatmeal Cookies.

Fudge Cake
Granny Elizabeth's special recipe
2 squares unsweetened chocolate
1/2 stick of butter
1 cup sugar
1/2 cup flour
2 eggs
1 cup chopped walnuts
3/4 tsp vanilla
Melt chocolate and butter over low heat. When mixture is melted, pour into a mixing bowl and add sugar, flour, and eggs. Mix until smooth. Add walnuts and vanilla. Bake in greased 9x9 glass dish at 325 for about 40 minutes.
[These gooey chocolately squares are really more fudgy than cakey, like super moist brownies. I think they could have cooked a little bit longer because they virtually fell apart when I tried to get them out of the pan. But who cares?!]

Pecan Pie Bars
3 cups flour
2 cups sugar (divided)
1/2 tsp salt
1 cup plus 3 Tbsp butter
4 eggs lightly beaten
1 1/2 cup light Karo syrup
1 1/2 tsp vanilla
2 1/2 cups chopped pecans
Preheat over to 350. Grease bottom and sides of 15x10x1" baking pan. In large bowl, combine flour, 1/2 cup sugar, and salt. With a mixer, cut in 1 cup butter until mixture has coarse crumbs. Press firmly and evenly into the bottom of the pan for the crust. Bake for 20 minutes. Meanwhile, melt 3 Tbsp of butter. In a large bowl, mix eggs, corn syrup, remaining sugar, melted butter, and vanilla until blended. Stir in pecans. Spread evenly over hot crust. Bake for 40 minutes or until set. Cut into bars.
[Like popping a mini pecan pie in your mouth with each square. Super rich and delicious. I would make the crust a little thinner next time, but the extra buttery goodness of a little extra crust was not a deal breaker.]

Chewy Oatmeal Cookies
Let me first explain that the amounts below are a little cumbersome because I took my mother's recipe, which yields an overabundant 5 1/2 dozen cookies, and cut it in half. Not an easy task considering I don't do math and the amounts of the ingredients were all in 1/4s and 3/4s and quarts, etc. My husband lent his calculating skills to the task and I think we got the amounts correct because the cookies are perfect. I'm sure more skilled chefs out there will laugh at my amounts and there are probably conversions that would make more sense. But c'est la vie. These cookies are good.
1 cup + 6 Tbsp of butter
1/2 cup + 2 Tbsp of sugar
1 1/2 cup + 4 Tbsp of brown sugar
3 eggs
2 tsp vanilla
2 1/4 cup flour
1 3/4 tsp cinnamon
1 1/4 tsp baking soda
5/8 tsp salt
3 cups Quaker oats, uncooked
7/8 cup pecans or walnuts
3/4 cup chocolate chips
Beat butter and sugars on medium speed until light and fluffy. Add eggs and vanilla. Mix well. Combine flour, cinnamon, baking soda, and salt. Add slowly to wet mixture and mix on low speed until well blended. Add oats, nuts, and chocolate chips. Place walnut sized dough balls on greased cookie sheet 2" apart. Bake at 375 for 12-14 minutes. Cookies will appear underbaked but will firm during cooling.
Monday, June 28, 2010
My Uncle Paul

The following obituary for my uncle ran in the St. Paul Pioneer Press. What it doesn't mention is how he would curse like a sailor when talking about politics, or how he wore black knee socks with shorts, or how he would always convince me that if I could kiss my elbow, I would get a pot of gold coins. He could fly through the NY times crossword puzzle every week. He was an amazing photographer and used his photos to make cards that I always loved receiving as a child. I'd love to have an album of all of his photos, so many of them taken at my grandparents home in Sparta—Granny's peonies, Pa dove hunting. He was a character. He will be missed.
Paul Dillon Howard: February 26, 1925 - June 24, 2010
Born on 2/26/1925 to Augustus & Lula (Dillon) Howard in Akron, OH. The family moved from Akron to Sparta, TN where Paul grew up. In 1943 he graduated from Sparta High School and made the decision to join the Navy. He participated in the Navy's V-12 program which led him to Penn State University where he would receive his bachelor's degree. After college Paul moved to St. Paul where he took on a job at 3M. It was during this time that he met Donna Tofting. The two were married and settled in Hudson. This marriage would be blessed with son, Gordon & daughter, Laura. After some time the marriage dissolved. In 1962 Paul married Marian Webster Kermott and lived in St.Paul for several years before taking a job with FreightMaster and moving to Ft.Worth, TX. In 1992 Paul and Marian bought a condo in Hudson and split their time between Hudson and Ft.Worth. Later in his career Paul started his own business, Transportation Marketing Inc and would run that until his retirement in 2005. In 2007 they moved to The Lutheran Home in River Falls. Paul was a very hard working and dedicated husband, friend, and father. He demonstrated a great work ethic and was loved and respected by all who were a part of his life. He enjoyed music - particularly Jazz. His favorite artists included Ella Fitzgerald and Louis Armstrong, among others. He also was an avid, self-taught professional photographer. He was never far from a camera and loved to take pictures of everything from flowers, to nature, family, to anything else that caught his attention including advertising photography for FreightMaster. Paul was a very longtime member of AA, always willing to help and lend support to others. He was also a lifetime member of the Hudson Masonic Lodge. His greatest joy was his family and he loved sharing his loves with his kids and grandkids. He had a wonderful sense of humor was always willing to do anything for anybody and left a positive impression on those who called him friend. Paul is survived by; his wife, Marian (Webster) of Hudson; son, Gordon Howard of Eau Claire; daughter, Laura Rush of Eau Claire; daughter, Katharine Kermott (John Ahern) of St. Paul; daughter, Pam Wasson of Fort Worth, TX; daughter, Claudia (Lynn) Rhymes of Santa Rosa, CA; sister, Vera (Jennings) Davis of Oak Park, CA; 12 grandkids and 3 great-grandkids; and ex-wife Donna Vierbicher. He is further survived by other relatives and many dear friends. A memorial gathering for Paul will be held on Sat 7/3 at the O'Connell Family Funeral Home in Hudson, WI from 11am to 1pm. The gathering will conclude with military honors provided by the Hudson American Legion and VFW. A very special thanks to the entire staff of The Lutheran Home for their loving care and continuing care of Marian.
10 Recipes (More or Less) in 2 Weeks

After a bit of a hiatus from the cookbook project (and the blog), a two-week vacation should allow for plenty of time to pick things up full steam. I have a handful of recipes that I've been wanting to tackle and finally have the time to really devote myself to the effort, uninterrupted by the demands of the job and the little one at my feet...she's in school this week while I'm at home and, while I love the peace and quiet of the house, I did have a little pang of sadness dropping her off this morning and turning around to go home without her. The older she gets and the more we actually communicate on a real, formed sentences kind of level, she's become this other person in our world instead of the baby we must tend to and feed and keep occupied, or the terrible two-year-old we're trying to restrain. She occupies herself most of the time now, with little scenarios that involve the Wonder Pets, or baby dolls, or stacking coins, or "reading" books. I sit with her in awe of all that she knows and how quickly she learns and retains.
So while the uninterrupted time will allow me to get back to this project, I have to say the quiet in the house right now is deafening!
Anyway, I started back at it this weekend with two savory casseroles, before I dive into a week of mainly sweets...which will just do wonders for my summer bathingsuit bod. I hope the neighbors are hungry.
The first is a casserole from my Granny Lula's collection, written on a weathered and yellowed index card in her handwriting: Carrot Casserole. Very few ingredients, sounds tasty, so I made it to go with a Saturday night dinner of roasted chicken and sauteed broccolini. Good color for the plate and maybe, just maybe, Olivia would like it since she loves carrots in cooked and raw form.

I really stayed true to the recipe as written; no tinkering, except for the addition of a nutmeg sprinkling on top before it went in the oven. The only question mark was the "2 cups grated cheese" ingredient...what kind of cheese? Which got me thinking, I bet there was only one kind back in the day: cheddar. I wouldn't normally put cheese with carrots, and my first choice probably would have been parmesan lightly sprinkled on top or something. Anyway, must ask mom about that one.
The casserole turned out to be souffle-like, light and fluffy. If you were going to tinker with it, I could see maybe adding some thinly sliced scallions, or add a little red pepper to add a little spice. But it was delicious as is, at least to me. Olivia didn't touch it.

Carrot Casserole
Lula Howard
3 cups mashed, cooked carrots
2/3 stick of butter
2/3 cup of milk
2 cups grated cheese
3 eggs, separated
Boil carrots with salt until mashable. Mix in butter, milk, and grated cheese. Separate three eggs. Beat yellows first and stir into carrot mixture. Then fold in beaten egg white. Pour into baking dish and top with more cheese (and a dash of nutmeg, my only addition). Bake at 325 for 45 minutes.
The next casserole is a breakfast dish that has made my mom famous: Creamed Eggs. It's a standard brunch item for us...Christmas, Easter, or any family gathering calling for a heavy and decadent way to start the day. If you're used to eating a small bowl of granola and a banana for breakfast, this will throw you into a food coma for sure. Add bacon and toast on the side, and you're done for the day.

Essentially here's the recipe: drown 6 hard boiled eggs in a rich creamy cheese sauce, top with more cheese, and bake. It's one of those things that my mom makes that screams home cooking for me, and it will always be a dish that I associate with her, with family gatherings, and with a full belly.

 Creamed Eggs
Vera Davis
6 hard boiled eggs, pealed
2 Tbsp butter
1 cup milk
2 Tbsp flour
1/4 tsp salt
1/8 tsp pepper
1/2 cup grated cheddar cheese
dash of Worchestershire sauce
sprinkle of paprika
Hard boil eggs and peal. Cut into quarters. Set aside. Melt butter over low heat. Mix flour, salt, and pepper, then stir into melted butter. Stir constantly with a whisk to smooth the sauce. Whisk briskly to avoid lumps. Pour in milk and stir as you mix. Boil until the sauce is medium thick. Add most of the cheese to the sauce, reserving some to sprinkle on top of the dish. Stir until melted and smooth. Add a dash or two of Worchestershire sauce and stir. Remove from heat and fold in eggs. Pour mixture into lightly greased casserole dish. Sprinkle with grated cheese and paprika. Bake at 350 for 15 minutes or until bubbly. [If you are making this for a larger group, use 12 eggs and double the sauce recipe.]
And yes, that is homemade bread on the side, fresh from the oven that morning. Feel free to clap.
More to come this week: cookie day, the pecan extravaganza, and overcoming the cake conundrum.
Subscribe to:
Posts (Atom)